Showing posts with label Fun Crafts. Show all posts

April 17, 2012

Twine Vase

Turning simple glass vases into a little something extra just takes thinking outside of the box. I purchased a couple simple glass vases from goodwill for $.50 and needed to spice them up a bit.

So what did I do, I grabbed my trusty twine, double sided tape, hot glue and got busy!

First thing I did was use my double sided tape to wrap around the vase as a little extra something to hold the twine in place.

Then I started at the very base of the jar, hot glued the twine and began to wrap. With each wrap around you have to make sure that you continue to push the twine close so that there are not any gaps...or at least not many gaps.

And you wrap and wrap and wrap and wrap and wrap and wrap and wrap and wrap and wrap and wrap and wrap and wrap and wrap and wrap and wrap and wrap and wrap and wrap and wrap and wrap and wrap and wrap and wrap and wrap and wrap and wrap and wrap and wrap and wrap and wrap and wrap and wrap and wrap and wrap and wrap and wrap and wrap and wrap and wrap and wrap and wrap yes I'm still doing this wrap line and wrap and wrap and wrap and wrap and wrap and wrap and wrap and wrap and wrap and wrap and wrap and wrap and wrap and wrap and wrap and wrap and wrap and wrap and wrap and wrap and wrap and wrap and wrap and wrap.

Once you're all done you have a pretty snazzy vase that is much more interesting than what you started with!

 I even took these two vases that we got from Chris's mother:
And painted them white! The blue was pretty and all but didn't really work in our home.

Very satisfied!

Tatum

March 24, 2012

DIY Pendant & Vases

*** For those of you who have bookmarked Manymomentsofme.com or*** Manymomentosofme.blogspot.com, please update your bookmarks to TatumsTake.com


There were several things in our house that bothered me when we first moved in. Some of the major eyesores were the unsightly builder grade light fixtures. The light fixture that I am going to focus on today is one of the three in our kitchen. I call it the spider light. You might remember it from prior posts:
I hate that builders are cheap and buy the most unsightly items to complete a house. Anyway, I would often say that I just want to rip this unsightly spider contraption out of the ceiling. And then one day, I found a solution. While hanging out at the goodwill one day, I saw it! A giant lamp for $12.99! Now, what does a giant lamp have to do with anything you wonder, well let me show you this here lamp.
The circumference of this lamp was 59 inches, rather large and exactly what I needed. Next Chris turned off the electric and took down the dreaded spider light. Once down, I spray painted it bronze and I cut the giant shade to size:
After cutting the shade I just so happened to have a piece of fabric left over from a closet project that was the perfect size! I proceeded to hot glue the fabric to the shade and here is the final product!!
Much better!! Here is the under view:
I initially thought that I was going to have to use a tension rod to hold the shade on but it wasn't necessary. We are so happy with the final product and all it cost was $12.99!! Frightening to fabulous just like that!

As for the glass globes from the before picture:

I found a way to use those too! Chris epoxied them together for me and since this was at Christmastime, we used them for vases to hold decor!!

Nothing wasted, much gained.

Tatum

I'm linking to Keeping it simple at Crafts keep me sane  DIY Showoff  Just Something I Whipped Up  Marvelous MessMaking Monday Marvelous , Tutorial Tuesday at Hope Studios, Nifty Thrifty Tuesdays at Coastal Charm, Get Your Craft On at TCB, Frugalicious Friday at Finding Fabulous,  Time for Ta-Da Tuesdays!        

November 28, 2011

Tissue Roll Wall Art

Who knew that there was more to tissue and paper towel rolls? I never knew until I began blogging that instead of trashing the tissue and paper towel rolls, I could have been putting them to good use! Not too long ago I asked my parents to begin saving their rolls for me. They said why? I said I'm not certain, but I think that I may be using them in a project for inexpensive art. Though my mom and dad began collecting them, my mom was like "I do not want any tissue roll art in my house" lol. Now, that sentence sounds completely sane to me. It would have been something that I would have said in the past too. Only, I am now enlightened. So after gathering the rolls I had a basket full:
Wall art was my goal but I didn't know exactly what I wanted so I  didn't do anything with them immediately, but weeks later I began to cut them up into small parts! They laid on the floor of our living room forever!! I later made temporary use of them by making Chris a cute happy birthday sign!

After that I began creating other random shapes:

It was so funny, Chris was like "wow, I didn't have a clue what you were attempting with those rolls but this is kind of cool". I could imagine his doubt and curiosity especially with the funny wreath attempt.  This is the second shape I came up with:
this second shape seemed to go on forever so I got rid of it and started again. Then this is what I came up with:
So finally confident on the design, I spray painted all of the parts espresso brown. I then took my hot glue gun and began to glue the parts together. Unfortunately once it was on the wall, I did not like it at all:
It looked way to floral to me. So, I took it apart and gathered another bunch of fun paper pieces and started again. This is what I came up with:
And this is what I'm sticking with...even though it looks a bit weird in this photo. I like the fact that it's way less floral, and that's good enough for me.
But this angle is so much better.

Tatum

November 21, 2011

A Stick And A Jar Of Sauce Meet In A Bar

Okay not really. I thought it would make a good joke, but I've got nothing. So anyway, about a month or so ago while out on a drive with Chris, I told him that I needed sticks. He was like for what? I said a project. So we hopped out of the car and began gathering up sticks from around trees and from dead trees (no live trees were harmed in this process, I think). Chris gathered the majority of the sticks because I didn't want to get attacked by anything creepy. We had to look a bit weird hanging out in the trees, but I had a goal. Ideally we would have trees in our yard that we could have stripped but we don't so we had to hit the streets.

Once all of the sticks were gathered we headed home and the sticks sat in our garage for a month. That is until we had spaghetti for dinner. Chris had no earthly idea of what spaghetti had to do with anything and by this point he had completely forgotten about the sticks in the garage. What do spaghetti and sticks have in common? Nothing. What do spaghetti sauce and sticks have in common? The jar. Still don't get it? Okay, let me give it to you this way; what do you get when you combine a spaghetti sauce jar with sticks? A stick vase suckas!!! It was obvious to me all along. Well not really. First my oh so crafty blog buddy Brandi completed a beautiful stick vase and then I saw this in Target for $19.99:
I was thinking seriously! $19.99 for some fake sticks and twine! Thank goodness I was enlightened. So I gathered my sticks and the empty jar:
and got to work. First I cut all of the sticks to size using the miter saw. Then I began to hot glue them to the jar:
I then added some twine to fill out the look and voila!! It was done.

 I think it looks pretty good. And all this cost me was a yummy spaghetti dinner.


Tatum

I am linking to Show and Tell at Blue Cricket Designs
and Look What I Made and Show Off Your Stuff
Make it Yours @ My Backyard Eden
DIY under $5Somewhat Simple

November 14, 2011

Headless Lamp

We have a headless lamp. A little lamp with no shade that was given to us. It has been headless for a while but I figured, I'll just buy a shade for it. So for about a year this little neglected headless lamp has been in a bag just existing...all headless.
While purging, I discovered said headless lamp and thought to myself, oh yea I was supposed to buy you a head. So in true Tatum fashion I begin to look around just to see what I could use that I already owned to give this little headless lamp a head.  Okay, the headless thing is beginning to creep me out so from this point forward we will use the word shade. The normal word. Yeah I could have been using the word shade all along but nobody has ever accused me of being normal...ask my family.

Moving on, I scoured the house for anything that could be turned into a shade, this is what I came back with:
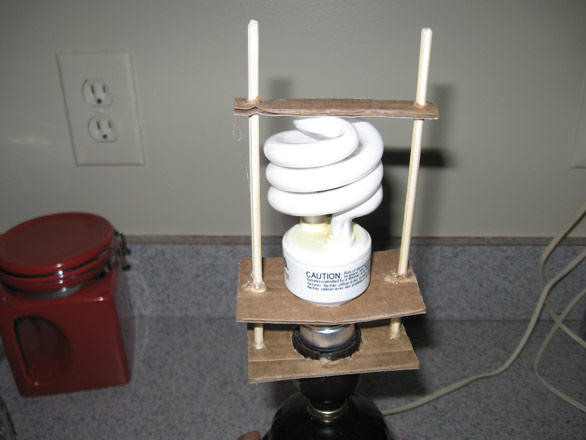
A hanger, leftover fabric, skewers and a glue gun. What lead me to said tools? My first frame-less lamp project. After forming the wire frame and using skewers at the top, this is what I came up with:
After having the lamp on for a while, the skewers began to loose their grip and fall off. So it was back to the drawing board to find a better way. Enter Chris, using some of the same tools he created this lovely contraption that offered much more stability:
 Yep, ingenuity at it's finest. In a cheap work with what you got kind of way.
I proceeded to spray paint the contraption black just so that if it was seen it would look a little less cardboardy...I am allowed to make up words if I want.
 I then swapped out the skewers with more wire and Chris added a screw to secure the top to the frame:
And it worked!!

Now I have a nice little counter top lamp. Is it perfect? No, but it works for us :-)

Tatum

November 7, 2011

No Cost Wreath Take 2

Well do you remember my wreath that I made with my tissue and paper towel rolls that were slated for another project?
It turned out great...well great enough. It definitely served the purpose of satisfying my diy wreath obsession, and it lasted for a total of 6 days. It would have lasted longer I'm sure but right after I made it there was rain rain rain for days. Never did the wreath get wet, but the moisture in the air kind of warped the shape:
 This was quite funny, at first I thought well it's not that bad. That was until I was driving home one day and looked at it and realized just how sad and saggy it had become. Down it went! Sooo, of course I was thinking how can I fix this. First thing I did was remove the leaves:
Then I threw this funny looking thing into the garbage. I proceeded to my old standby more old molding. I measured out the dimensions and cut it to size:
I hot glued the pieces together, spray painted it with metallic paint:
And I began to affix the leaves:
And it was done...and sturdy!

Much better. I think I'm officially done with diy wreaths. For now at least :-)

Tatum

October 24, 2011

Woodwick Reuse

Doesn't that word Reuse look weird?? I had to look it up just to make sure I was using it right. Anyway, I was given two Woodwick candles for my birthday not too long ago. I loved them and they lasted quite a while.

When they were practically all burned out they were headed for the garbage can...that is until I stumbled upon one of my blog buddies sites and she just so happened to be re-using her Woodwick jars! I wish I could remember which lovely lady it was to give her credit so if you're reading this, I'm sorry, please make yourself known again :-)

I really need to think before I throw things away, the moment that I get rid of something a new use for it comes along, only it's too late by then.  So I took my practically empty jars:

and I cleaned them out:

 I put the remaining candle wax in a pot on low just so that I could appreciate the scents a little bit longer:

I then painted the lids brown to get rid of the Woodwick logo:
You can ignore the silver and gold paint. They were used for a failed attempt at painting a design on the lid. Once the design failed I was still quite happy with the new jars use!

And to think, I was about to throw them away.
Tatum

LinkWithin

Related Posts Plugin for WordPress, Blogger...

AddThis